Tag Archive | Homemade

The Cowboy Burger

So the weather has been spectacular and it got Kevin and I thinking about making some burgers on the barbecue. So last night when we went grocery shopping we made sure to pick up all the ingredients!

I got to thinking a stuffed burger was what I wanted so I went to work and came up with these honking burgers! They are stuffed with all sorts of good stuff but the key is the cheese and the bacon!

20130329-193524.jpg
Like with the Turkey burgers I posted I suggest making these burgers in advance and letting them sit covered in the fridge so the flavors can really come together.

Ingredients
1 pound lean ground beef
1/3 cup finely chopped onion
1/3 cup finely chopped pepper
1 egg
1/2 cup real bacon bits
1 cup cubed jalapeño jack cheese
1/4 cup barbecue sauce
1/3 cup oats
1/4 cup crushed nacho chips
1/4 cup crispy onions
4 cloves garlic
1 teaspoon garlic powder
1 teaspoon Italian seasoning
1 teaspoon salt free seasoning
Pepper to taste

20130329-194937.jpg

20130329-195140.jpg

Method
Combine all ingredients in a large bowl and combine well. Form into patties and cover then refrigerate.

20130329-195944.jpg

20130329-195953.jpg
Cooking
I would imagine these could be pan fried but barbecued is best! I started them on foil liberally sprayed with cooking spray and then transfer to grill for the last five minutes of cooking. Be sure to cook to a safe internal temperature.

20130329-200207.jpg

20130329-200212.jpg
I served these burgers with maple bacon, havarti cheese, hot peppers, mini pickles and sautéed onions and mushrooms!!!

20130329-200428.jpg

20130329-200441.jpg
Ummmm delicious!!!!

Homemade Perogies!!!

Hello Blog world! I’m most definitely still taking up residence on my couch. No work for me again today! Also no adventures in the kitchen either. Bronchitis sucks!

However I do have a recipe to share with you! Last week I made Perogies from scratch and Kevin said they were the best Perogies he’s ever eaten!!! Making perogies isn’t extremely difficult, just time consuming with the folding and the pinching. Don’t let the time investment deter you. These yummy bites of potato deliciousness are worth it!
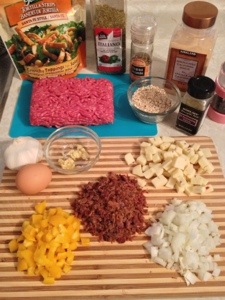
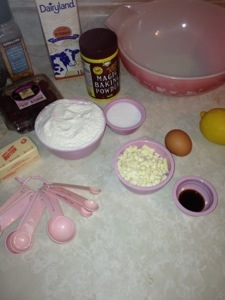
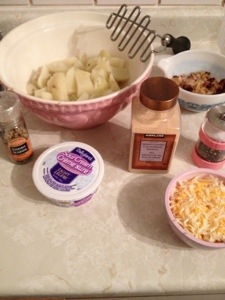
20130318-132842.jpg
Filling Ingredients
4-5 Large potatoes
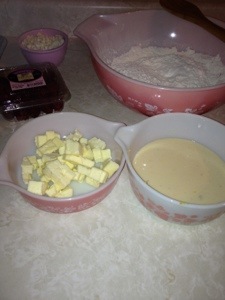
2 tablespoons butter
1 tablespoon garlic
1 tablespoon Italian seasoning
1/4 cup sour cream
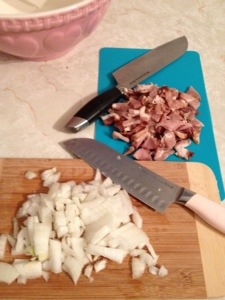
6 strips of bacon cut into pieces
3/4 cup chopped sweet onion
1 cup shredded cheese of your choice
Salt and pepper to taste
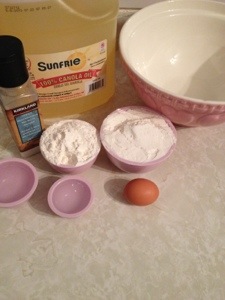
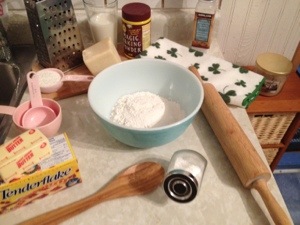
Dough Ingredients
3 cups of flour
Pinch of salt
1 tablespoon garlic powder
1 tablespoon Italian seasoning
1/2 teaspoon pepper
3/4 cup water
1 egg
2 tablespoons vegetable oil

20130318-134012.jpg

20130318-134039.jpg
Method
Start by peeling and chopping your potatoes and cooking them as though you were making mashed potatoes.

20130318-134155.jpg

20130318-134211.jpg
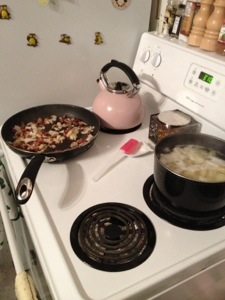
Next start pan frying your bacon pieces and then chop your onion. Once bacon begins to crisp add the onion to the pan and cook for another 3 minutes.

20130318-134353.jpg

20130318-134414.jpg
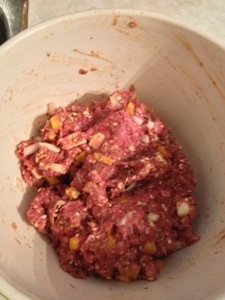
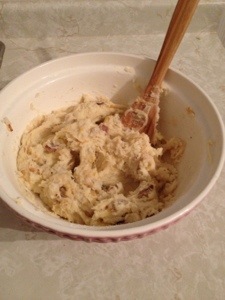
Once your potatoes are done cooking drain and return to large bowl to mash. Mash with butter, sour cream, garlic, and spices. Once mashed mix in cheese, bacon and onion. Set aside to cool.

20130318-134626.jpg

20130318-134642.jpg

20130318-134656.jpg

Dough Prep
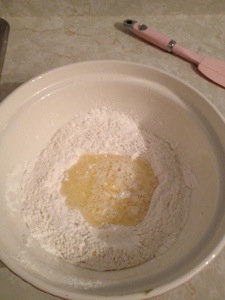
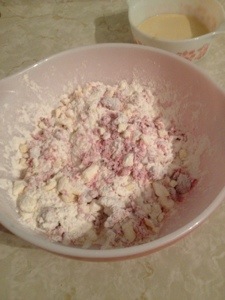
In bowl, mix together flour and salt,garlic,Italian and pepper.

In another small bowl beat together egg, water and oil. Stir into flour mixture, adding a touch more water if needed to make dough soft but not sticky.

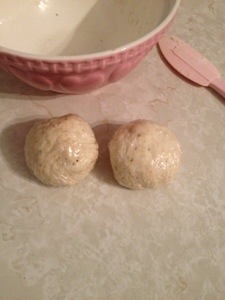
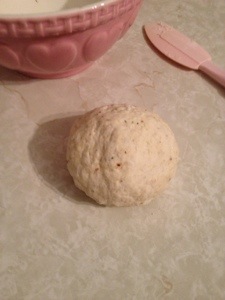
Turn out onto lightly floured surface; knead until smooth. Rip dough in half and cover with plastic wrap or damp towel and let rest for 20 minutes.

20130318-140017.jpg

20130318-142646.jpg

20130318-140112.jpg

20130318-140125.jpg

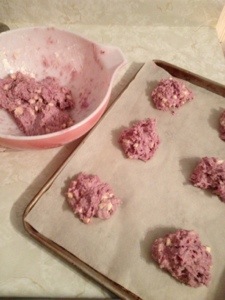
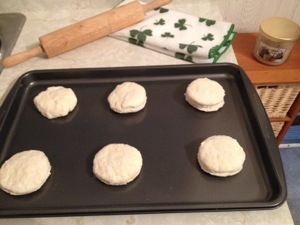
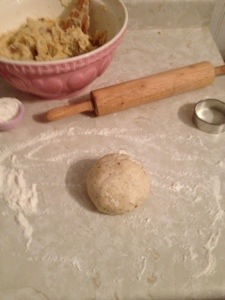
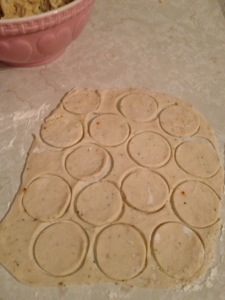
Now for the fun part! Take one ball of dough and rip it in half. On a lightly floured counter roll out dough very thin, about 1/4 inch thick. Using a round biscuit or cookie cutter cut dough into 10 rounds. Re-rolling as little as possible.

20130318-140653.jpg

20130318-140721.jpg
Fill each round with a small amount of filling. Fold perogie in half and gently pinch edges of dough together. If you’re having issues making the edges stick moisten edge with a tiny amount of water.

20130318-141100.jpg

20130318-141122.jpg

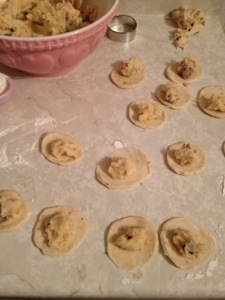
Place perogies on a flour dusted cookie sheet and cover with a dry, clean tea towel. Repeat process with each portion of dough. You should get 40 – 50 perogies out of this recipe.

You are now ready to cook your perogies or freeze them at this stage. To cook them bring a large pot of salted water to a boil and place some perogies into the water and allow to boil for a few minutes until they pop to the surface. Be sure to do this in batches as to not over crowd the pot.

20130318-141549.jpg
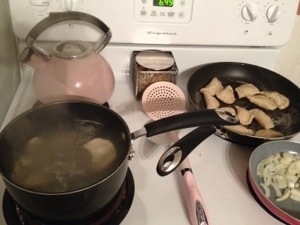
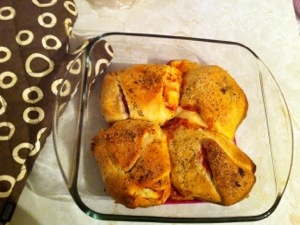
Once they surface transfer them to a frying pan with some butter and cook until golden and crisp.

20130318-141710.jpg
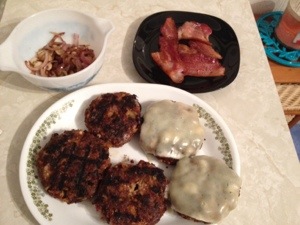
I served these with barbecued locally made farmers sausages, sour cream and fried onions. I really think the addition of spices to the dough really gives these perogies something extra.

Blueberry And White Chocolate Scones

Good morning, I hope everyone is doing better then I am! I am currently holed up on my couch. I managed to get a late afternoon appointment with my family doctor yesterday who confirmed my suspicion that I do in fact have bronchitis! Yuck! Definitely not how I planned on spending my weekend.

Anyways enough about me! On to the good stuff! Here is the recipe for the Blueberry white chocolate scones I mentioned in my last post. These are amazing and actually very pretty. Not very sweet but again the white chocolate helps in that area. I think they are fabulous with a little lemon curd.
20130316-094902.jpg
Ingredients
3 cups flour
3 tablespoons white sugar
1 tablespoon baking powder
Pinch of salt
1/2 cup cold butter cut into chunks
1 cup of buttermilk
1 egg
Juice from 1/2 a lemon
Zest from a lemon
1 cup of blueberries fresh or frozen
1 cup white chocolate chips or chunks

20130316-095449.jpg
Method
I did this in a food processor but feel free to do it by hand, or with a pastry cutter.

Place sugar, butter, flour, salt, baking soda in the bowl of the food processor and pulse until mixture resembles crumbs. Dump into large mixing bowl. Add blueberries, chocolate and lemon zest and gently toss the berries to coat in flour mixture.

20130316-095808.jpg

20130316-095820.jpg
In a smaller bowl mix together the milk, egg, lemon juice. Once mixed add to dry ingredients.

20130316-100056.jpg

20130316-100116.jpg
Stir with a wooden spoon or spatula until mixture comes together nicely.

20130316-100239.jpg
Turn out in lightly floured surface and kneed until dough forms. Do not overwork the dough. Form dough into round mound and then flatten out in a circle to about 3/4 to 1 inch thick.

20130316-100500.jpg

20130316-100520.jpg
Cut into triangle wedges and place on parchment lined baking

20130316-100632.jpg
Brush with buttermilk and sprinkle with sugar (I used vanilla sugar) if desired. Bake at 400 degrees for about 18-20 minutes. Let cool on a wire rack.

20130316-100824.jpg
I hope you enjoy these scones, my friends and family definitely did.

20130316-101127.jpg

White Chocolate Raspberry Drop Scones

So I spent some time researching scone recipes yesterday. The ingredients list is pretty basic while there are many ways to form the actual pastry shape. You can make them round, square, triangles, whatever you like! Everything I read pointed to the same advice, keep everything cold and work the dough as little as possible. So after doing some research And with the advice in mind I went to work and decided to come up with a simple drop scone recipe!

These scones come together quickly and form a rather sticky dough. Don’t panic that’s ok. There is no rolling out of the dough so the stick factor isn’t an issue.

These scones come out with a nice crisp outside and a soft melty inside. The white chocolate adds a wonderful sweetness as the scones aren’t overly sweet themselves.

20130314-164951.jpg
Ingredients
2.5 cups flour
1.5 tablespoons baking powder
Pinch of salt
1/4 cup sugar
1/2 cup cold butter cut into small chunks
1 cup white chocolate chips
1 cup raspberries fresh or frozen
1/2 cup buttermilk
1 egg
1 teaspoon vanilla
Juice from 1/2 lemon
Zest from 1 lemon

20130314-165733.jpg

Method
Combine dry ingredients and add cold butter. Work with hands to form crumbs. Add chocolate chips and raspberries. Work dough to slightly smash the raspberries. Add buttermilk and mix until everything is just mixed.

20130314-170150.jpg

20130314-170203.jpg

Drop onto parchment lined cookie sheet. About 1/2 cup per scone.

20130314-170549.jpg

Bake at 375 degrees for 18-20 minutes. Cool on rack and enjoy. I got 9 out of this batch.

20130314-170713.jpg

20130314-170725.jpg

20130314-171000.jpg
I love the color these come out having because of the smashed raspberries. I enjoy the simplicity of making them in this method. I actually made two batches of scones this morning. I made blueberry and white chocolate scones but in a more traditional way. Those ones I cut in triangles. I will post that recipe soon.

Let me know what you think if you try this recipe. I hope you enjoy the scones.

Cilantro Lime Turkey Burgers

20130311-190556.jpg

Who says a burger can’t be healthy!!!! These little babies are healthy, filling, and down right delicious!

I invented a version of turkey burger a few years back that have become a staple in our house, as well as at my work! I will share that recipe with you sometime soon! Until then this is another of my own creations that I think you might enjoy! These burgers have a spicy kick thanks to the jalapeño but feel free to omit it if you don’t like jalapeño spice! The cilantro and lime pair well with the feta to liven up dull but healthy ground turkey breast meat!

Ingredients
1 pound ground turkey
1/4 bell pepper (chopped)
Handful fresh basil leaves (1/4 cup chopped)
4 green onions chopped
1 cup loosely packed cilantro chopped
Juice from 1 large lime (1/4 cup)
2 cloves garlic
1 small jalapeño diced (amont dependent upon your taste)
1 egg
1 cup feta
1/3 cup oats
1/3 cup crispy onions (optional)
1 tablespoon garlic
1 tablespoon salt free seasoning
Pinch of salt
Fresh ground pepper to taste

20130311-191616.jpg

Method
Mix everything together in a large bowl and combine with your hands! Pretty simple!

20130311-191805.jpg

Form patties, pressing ingredients together firmly. I usually get 6 good size patties out of this recipe.

20130311-191915.jpg
I like to let the burgers sit so the flavors can meld. This can be as little as 15 minutes or as long as 8 hours covered in the fridge! The longer they sit the better they are in my opinion but let’s face it we don’t always have that kind of time!

Cooking
When I’m at home I like to let Kevin grill these babies on the BBQ. Always be sure to spray the grill well because there is very little fat in these burgers.

When I’m cooking at work I do them in a large skillet with a little olive oil.

20130311-192333.jpg
I like to flip them frequently to ensure they brown evenly. Cooking this method usually takes about 13 – 15 minutes. Just ensure you cook to a safe temperature.

20130311-192540.jpg

20130311-192548.jpg
I’m a big cheese fan and have tried a number of combinations on these burgers. Tonight we went with havariti. Whatever kind of cheese you like! It’s up to you! My favorite is smoked Gouda.

20130311-192748.jpg

I always like to serve these with guacamole! I posted my recipe for it Here. They also go well with tzatziki or on a bun with your favorite burger toppings!

I hope you give them a try and let me know what you think!

Stuffed Pizza Rolls

20130309-122803.jpg

A few weeks back I posted about making the stuffed pizza rolls using the Pillsbury crescent roll dough. I loved them but Kevin wanted to try the version my girlfriend made. I have to admit after seeing the photos of hers on Facebook I was eager to try her version! Of course being me I had to tweak it to my own liking! I added pizza sauce inside the rolls instead of just using it for dipping.

Ingredients
1 jar of pizza sauce
1 can of Pillsbury grands biscuits
16 slices of pizza pepperoni
1/3 cup chopped green pepper
1/2 cup diced red or sweet onion
1/4 cup diced hot peppers (optional)
1.5 cups shredded cheese
1 egg
1 tablespoon garlic powder
1 tablespoon Italian seasoning
2 tablespoons parmesan cheese
20130309-124853.jpg

Method
Flatten the biscuits into rounds and spread with pizza sauce. Add peppers and onions. Top veggies and sauce with 2 slices of pepperoni and cover in cheese.
20130309-130101.jpg

Carefully bring up edges and pinch together to seal and form a ball.

20130309-130149.jpg
Place in greased cake pan and continue until all 8 balls are formed. Brush pizza rolls with egg wash and sprinkle with Italian seasoning, Parmesan, and garlic.

20130309-130345.jpg
Bake at 350 degrees for 18 to 20 minutes. Sprinkle with remaining shredded cheese and return to oven briefly to let it melt.
Serve with pizza sauce for dipping!

20130309-130520.jpg

Enjoy!

Luscious Lasagna

When I think of home cooked hearty, comfort food meals lasagna always makes the list! Yes it is a fairly labour intensive meal but I find I can have the veggies chopped, sauce made, assembled and in the oven in about 45 minutes. Not an every night type of meal but delicious and healthy! Plus the added bonus of leftovers for tomorrow’s lunch or dinner!

I use ground turkey to make my lasagna but I’ve used ground beef, veggie ground round, as well as a beef Italian sausage mix in the past. All turn out wonderful but ground turkey is the leanest and healthiest choice. I mean other then the veggie option of course!

I also like to use the no boil noodles but again in the past have used the traditional type. I just find it adds to the prep time and I’m not a fan of burning my fingers on slippery hot noodles! Quit snickering ladies 😉 I am a big fan of the Trader joes no boil noodles because they have a nice texture once cooked. I am also a jan of the Trader Joes basil marinara sauce. Ummm yum! However if you’re anything like me you will use whatever you have on hand!

So here we go!
Ingredients

20130305-185815.jpg
1 pound ground turkey (or beef/meat of your choice)
2 cups cottage cheese or ricotta
2 cups mozzarella (I use low fat)
1 bunch of basil (1/2 cup chopped)
1 bunch cilantro (1/4 cup chopped)
4 cloves fresh garlic
1 jar marinara sauce or pasta sauce of choice
1 box of lasagna noodles
1 onion
1 pepper
2 tablespoons finely chopped. jalapeño (optional)
1 can mushrooms (optional)
2 cups baby spinach
1 egg
Olive oil for sautéing
1 tablespoon garlic powder
1 tablespoon Italian seasoning
Seasoning salt & pepper to taste
1/8 teaspoon cinnamon (optional but delightful)

Sauce prep
Chop onion, pepper, chopped jalapeño, 2 garlic cloves and sauté with a tiny but of olive oil for about three minutes. Add in meat, garlic, seasonings of choice and sauté
until cooked. Once the meat is cooked to a safe temperature add in the marinara sauce and 1.5 cups of water. At this point if you are using the cinnamon add it now! Trust me it makes the flavours really pop. Turn heat down to lowest setting and allow to simmer for a few minutes.

While the meat sauce mix is cooking prep the cottage or ricotta cheese by simply adding the egg, chopped basil, cilantro, garlic seasonings if choice and mixing well!

20130305-191535.jpg

20130305-191548.jpg

Assembly
At this point you are ready to assemble start by placing 1/3 of the sauce mix in the bottom of a large casserole pan and topping with a layer of noodles and another 1/3 of sauce. Add another layer of noodles and top them with the cottage cheese mixture. Spread mixture out evenly and top with baby spinach and another layer of noodle! Top those noodles with the remainder of the sauce spread mozzarella cheese on top! Cover with foil and bake at 375 degrees for 55 minutes! I like to spray my foil with Pam to keep the cheese from sticking. I also like to broil the lasagna uncovered for a couple of minutes before removing from the oven.

20130305-192228.jpg

20130305-192254.jpg

I bake my lasagna on a cookie sheet because if you ever have to clean bubbled over lasagna out of your oven you will quickly decide you never wish to do it again!!!

20130305-192508.jpg

Be sure to let your lasagna sit for 10 – 15 minutes before cutting. Enjoy!

20130305-194037.jpg

Lovely Lemon Bars

So I’m at work after an extra day off on the weekend. I caved on Sunday and called into work and took the night off after realizing I just didn’t feel up to going into work. I guess it is all part of the process and I just have to get use to it.

Onto happier, sweeter topics! On Saturday I had some free time and decided to whip up a batch of lemon squares. These little delights require a bit off effort and a lot of eggs but are indeed worth it!

20130305-103230.jpg

Ingredients
Crust
2 cups of flour
1/2 Powdered sugar
2 tablespoons cornstarch
Pinch of salt
3/4 cup butter

Filling
6 eggs
2 1/4 cups sugar
5 tablespoons flour
Zest from one lemon
1 1/4 lemon juice
1/4 cup milk or cream

20130305-103858.jpg

20130305-103937.jpg

Method
Crust
In a large bowl combine dry ingredients (I sift the powdered sugar in) and cut in butter. Mix with hands until mixture resembles crumbs. Press mixture into a greased pan. Bake at 350 degrees until edges turn golden about 15-20 minutes. Prep filling while base is baking!
20130305-104852.jpg
Filling
Mix sugar and flour together in medium bowl. Lightly beat eggs in a bowl and add in sugar, lemon juice,zest and milk. Once mixed add liquid ingredient mix to the sugar/flour mix. Stir everything together until we’ll mixed.

20130305-105050.jpg
Pour filling mixture over base and return to oven for 15 -20 minutes until filling mixture sets.

20130305-105302.jpg
Cool on a rack and store left overs in the fridge or freeze.

20130305-105409.jpg

20130305-105436.jpg
I like to use a tart pan to make bars so I can remove the sides to make cutting easier but a lasagna pan lined in foil with extra foil over the edges to lift out works as well.

I like to dust these with powdered sugar before serving, or eat them over the kitchen sink… Which ever 😉

Rainy Day Baking – Cheese Biscuits

It is raining sideways! It has been raining for over a week straight!!!! I’m so over it! I woke up this morning and decided to make a country breakfast! I whipped up a batch of cheesy biscuits to make egg and bacon breakfast muffins with organic fingerling home fries!

20130302-134921.jpg

These biscuits can be made with or without the cheese and cut to any size you desire. They are wonderful fresh out of the oven still warm with a pat of butter, jam, or whatever you love… Lemon curd! They are super easy to make and beat the pants off those can biscuits! Give them a try!

Ingredients
3 cups flour
4 teaspoons baking powder
1 tablespoon sugar
Pinch of salt
3/4 teaspoon cream of tartar
1/2 cup butter
1/4 cup shortening
1 cup buttermilk (if you don’t have buttermilk mix 1 tablespoon of lemon juice in your cup of milk and let stand five minutes)
1 cup grated cheese (optional)
I’ve added herbs, garlic, bacon bits, chives, etc in the past with great results. These biscuits are very versatile.

20130302-140242.jpg

Method
Mix together dry ingredients and cut in butter and shortening. Mix with hands until mixture forms crumb texture. Pour in buttermilk and work together with hands. Once dough begins to form add in cheese or other yummy bits of your choosing!

Turn mixture out onto floured counter and roll out to about 3/4 to 1 inch thickness.

20130302-140921.jpg

Use a drinking glass or biscuit cutter to cut dough into rounds. Place on ungreased baking sheet and bake in preheated oven (425 degrees) for 13 – 15 minutes…less time if you make smaller sized biscuits.

20130302-141423.jpg

Place biscuits on cooling rack as soon as they come out of the oven!

20130302-141525.jpg

Serve warm with butter, jam, etc. or top them with an egg and bacon for a delicious breakfast muffin!

This morning I only made a half a batch and they still turn out perfect!

Let me know if you try them and what you think!

Homemade Pizza Rolls!

So despite these not being 100% healthy they are a yummy snack/treat!

20130221-202015.jpg

These were so easy and so quick to make! I used one can of Pillsbury grands crescent rolls spread then out and sprinkled them with Parmesan cheese, garlic and pizza sauce. I then put a few slices of pizza pepperoni and garlic havarti cheese and then rolled them all up. Placed them in a Pyrex dish and sprinkled the top with more Parmesan and Italian seasoning. Baked for about 20 minutes at 375 and proof yummy snack to kill a pizza craving!!!